
Create Seamless Tileable Textures
Advertisements
Create Seamless Tileable Textures
To be able to use photos of textures and structures effectively in 3D projects, they should be revised for most purposes beforehand, so that the transitions of the textures are seamlessly tileable.
There are many possibilities for this. There are some special programs on the market that are supposed to do the job. Unfortunately, the results are not really useful. If you want a high-quality texture that you can use in other projects, there is no way around the manual creation in Photoshop over. In our archive, you will find over 350 free seamless textures with their PBR maps.
Today we will learn the basics of creating a seamless texture
Step 1: Choose the appropriate basic photo for the texture
Especially important is the selection of a suitable photo. It should be noted that the picture already shows a relatively large surface of the object, in order to avoid a too frequent tiling in the later rendering. Consequently, one should take a sufficient distance to the object.
In addition, the structure of the texture should be reasonably regular to avoid a later tile effect. If there are relatively conspicuous areas in the structure, they are noticeable during the later tiling. In my example, I chose a gravel surface for my texture.

Step 2: Select the area for texture
We can use the entire area of the photo, but usually, it makes more sense to decide for a section of the photo, which is used for the creation of the texture. To get a first impression of the later possible tile effect, we can control the basic photo directly as a tile copied side by side.
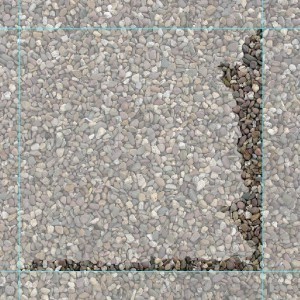
In any case, it can be seen that there are already noticeable tiling effects through the dark edges and central areas in the 9 tiles shown.
Important: This is not because we have not yet created a smooth transition, but because there are more or less darker and lighter areas in the captured photo.
We therefore choose a smaller area for our gravel texture, which is not so strongly influenced by the shading and the darkened zone. So I go back to the source image, select the selection rectangle tool (M), and choose a rectangular area (press Shift when selecting) that looks something like this and includes as homogeneous a region as possible. Make sure that the size of the selection contains as many pixels as possible.

I made the selection visible once through the masking mode (shortcut Q).
Now I mark the selection by drawing helplines from the rulers on the edge of the working document (if not visible, pressing CTRL + R once) and letting them snap onto the respective pages of my selection.
Step 3: Create a seamless transition of texture
The important thing about a tileable texture is the seamless transitions, so you can string the texture together almost endlessly. For this, it is necessary that the right end of the picture fits seamlessly with the left beginning of the picture. The same is true in the vertical direction with the upper and lower image areas.
We deliberately chose only part of the image for our texture. Now we can take a picture strip that is located on the left side of the selection and copy it to the right side of the picture. So we select a strip, copy it to a new layer (CTRL + J) and move that area to the right side of our new texture.
Copy and move the left margin outside the selection
To clarify, I have once laid a white layer with attenuated opacity between both levels.
Now we have at the edge of the picture in the vertical direction ever a seamless
But now we have to mix the new layer with the one below, so that there is no edge visible at the left end of the new strip.

We next retouch with the eraser tool (E) with a brush size of about 30 px and a hardness of about 50%. Anyone who uses a tablet or has a steady hand on the mouse can also use the lasso tool (L) and soften the selection with soft edge (CTRL + ALT + D) afterwards.
You should make sure that you do not erase the pebbles on the new level halfway, but leave completely – then the result looks pretty good. In addition, you start at the top and bottom of the corner and let the superimposed level pointed at these corners. We do this because we want to do the same step with layer overlay for vertical tiling, and then we’ll have it a bit easier later. The new layer looks something like this:

As I said, we now proceed in the same way for the vertical orientation. So we choose a strip from the top area above our texture, copy it to a new layer and move it to the bottom of the new texture.
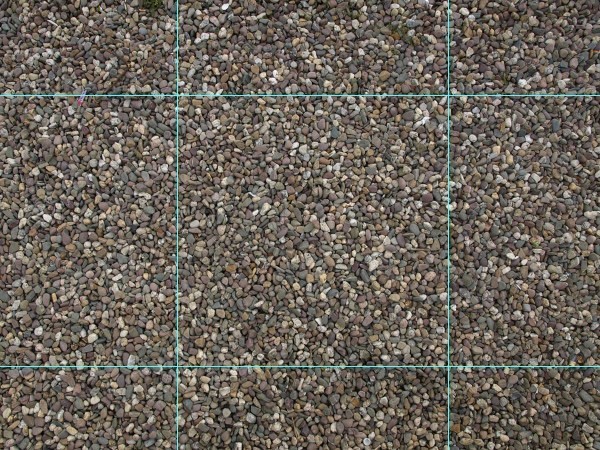
After completing the new gravel texture edges, our result looks like this:

Step 4: Finetuning the texture created in Photoshop
As far as we can be quite happy with the result. Therefore, we can first reduce all visible layers to one layer (Shift + Ctrl + E), mark our selection limited by the guides, and unlock the selection. (Image / cropping)
We can now control the tiling effect by going back to 3D / New tiling.


If you compare the result with the first test, you realize that we have bypassed the selection with the darker areas and have a more regular texture. The rough direction is fine, so let’s take care of a few details.
To do this, we undo the last action to get the texture back to its original size. Since we have copied the respective opposite area to the edge, the page areas already fit together. However, there may be inconsistencies in the corners when they are in tiling. Although we have rejuvenated especially the side strips to the corners, but usually remains a small remainder on which we retouch next. For this we use the filter displacement effect. So we go to Filter / Other Filter / Displacement effect and enter half of the image size in Horizontal and Vertical. Since in my example the file is now 1600 px x 1600 px, so I enter 800 px and 800 px.
What happened now? Photoshop divided the image into four equal-sized squares and moved them to the diagonally opposite corner. The bottom line is that our potential texture transitions are exactly in the middle.
For better orientation, I draw a vertical and a horizontal auxiliary line from the ruler and let them snap into the center of the picture. Now we can check along the guides for our later transition. Of course you do not recognize a transition, because we have copied and set exactly the right piece.

A weak point has the whole but still and that the center. Here you can see that the transition is not yet 100% clean.
To retouch the area as uncomplicated as possible, we simply use the stamp tool (S). Select the area from which we want to copy with the ALT key and move a little over the area with a soft brush tip. Here you should again make sure that you orient yourself as possible to the contours of the pebbles.
Also with the stamp, I go now even a bit too dark pebble, which I noticed in the review of the tiling effect.

It is not the basic way to create seamless textures but it is base of the idea. On the next article, I will talk about other methods for creating seamless textures.